Showing posts with label Quilts. Show all posts

Thursday, April 20, 2017

A to Z Challenge: Quail Run and Quilts


I mentioned earlier on that DH and I often spent time together in the kitchen at either his apartment or mine, but we also had some lovely evenings eating out.  One of the first special evenings we enjoyed together was in July of 1981 when we had dinner together at a restaurant called Quail Run.  The restaurant was located up in the foothills and dinners were seated next to large picture windows overlooking the meadow and forest outside.   Little creatures such as rabbits and quail were often seen scampering around outside, and perhaps a deterrent to the appetite if you happened to order something similar from the offerings on the menu.   I don't actually remember what I ordered that night, but I don't believe it was rabbit or qual.

I can't seem to create a letter Q blog post without bringing up one of my favorite subjects:  Quilts.
This is especially true this year that I am blogging about our courtship.    Quilting is quite the tradition in our family.   My dear mother-in-law created a gorgeous work of art during the time that I was in Colombia, and presented it to DH for Christmas while I was gone. The photo below doesn't do justice to the hand quilted fan quilt pictured below, where it is folded in half over a small twin bed.  This quilt is a true treasure in our home.


My own dear mother has made several quilts for us over the years, including the colorful patchwork quilt pictured below.


Every time a young couple becomes engaged to be married, my extended family gathers together to create a quilt for them, so one summer day in 1983 we all gathered at my Aunt's home to work on the family quilt.

As you can see, all family members, young and old, male and female were invited to eat and visit and quilt,   My dear father no undoubtedly put in a few stitches, as did my brother with his long arms.  My mother and one of my dear aunts are pictured above . .

And who else is sitting there right in the middle putting in his own stitches? 


 You're absolutely right.  It's my own DH.

This beautiful quilt has been used well and often in our home throughout the years, as a covering for our bed, to bundle up cold babies and children watching TV, and even as a prop in a favorite game invented by the kids that they called  "The Green Blob"  I'm still not sure exactly what the rules were, but somehow involved older brothers covered by the quilt sneaking up on and scaring younger sisters.   Even though the batting in the quilt is now quite compressed and the fabric is very well worn,this is still a popular bed covering for visitors in our home.   

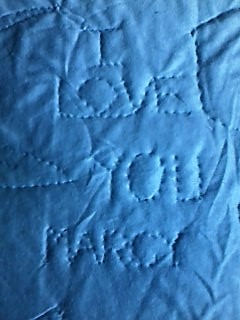
But perhaps the most cherished attribute of this beautiful quilt is a special message stitched along one edge, the brainchild and creation of my own DH.


Can you see it???  
Saturday, April 6, 2013

Flying Geese and Flying Dutchman: Blogging from A to Z

Flying Geese is a popular quilt block that can be used in a variety of ways.  It is made from three triangles and can be a bit tricky to put together correctly.  There are several methods for making flying geese, some of which require special plastic templates and rulers. I learned to make flying geese in the quilting class that I took several years ago, but remembered it as being a bit   difficult and leaving leftover scraps that were not very usable.  One of my dear friends from work is a prolific quilter, and recently told me about the No Waste Method for Making Flying Geese, so I decided to try it out.  To  make four flying geese units, I used one large square and four smaller squares of a contrasting color.  I  made a total of eight flying geese units:  four with a red print, and four with a dark blue. My large squares measured 7 and 7/8 inches.  I also needed eight 4 inch squares of my white on white fabric.  Though the method is really quite simple, the instructions are a bit lengthy, so I will not include them in this post, but refer you to this link.

Here I sewed two white squares to each larger colored square 1/4 inch to each side of the diagonal,

then cut them on the diagonal and pressed the seams.   I then sewed another white square
onto each unit, and cut them on the diagonal again.

This gave me eight flying geese units.

Flying Geese are often used to make a nice border for a quilt.

They can also be pieced together in different arrangements as part of a quilt block.  This pinwheel type arrangement is called the Flying Dutchman.

Once again I'll refer you to the Benni Harper Mystery Series by Earlene Fowler.  There isn't a book called Flying Geese, but book number 4 in the series is called Goose In The Pond, and  features another interesting quilt block pattern using Flying Geese.

  Happy  Quilting and Happy Reading!


PS  Today and tomorrow I will be watching  LDS General Conference.  Every spring and every fall living prophets share divine counsel pertinent to the challenges we face in today's world.  I encourage you to check it out here, or to check your local TV listings for times when it may be broadcast in your area.  On Monday I will be posting my thoughts on what I hear.

Friday, April 5, 2013

Eight Point Star: Blogging from A to Z

I have always loved star quilt patterns.  The are many ways to make star quilt blocks, but I have especially loved the eight point star made from eight 45 degree diamonds.  This was not covered in the quilting class that I took several years ago, and everyone says that working with diamonds can be challenging, but I do have a book that gives some instructions, so I thought that I would give it a whirl.  First I traced a paper template from the book to use as a pattern for cutting my diamonds.  I cut four red patterned diamonds, and four dark blue diamonds.  I then sewed each red diamond to a blue diamond along one edge, making four units.  Next I sewed the four units into two units:


The last step was to sew the two halves of the star together.

As you can see, my points don't match up very well, and I haven't quite figured out how to trim down or press the bulk from the eight points all meeting together to make a nice flat block.  I'm going to have to work some more on this one before I can add the white squares and triangles around the star to complete the block.  Any suggestions?

I also just came across a pattern for an eight point star block made from half-square triangles like those used for the broken dishes pattern.  I may just have to try that method soon, because I really do like Eight Point Stars!